writeup
DNS in detail
https://tryhackme.com/room/dnsindetail
Task 1 What is DNS?
What is DNS? DNS (Domain Name System) provides a simple way for us to communicate with devices on the internet without remembering complex numbers. Much like every house has a unique address for sending mail directly to it, every computer on the internet has its own unique address to communicate with it called an IP address. An IP address looks like the following 104.26.10.229, 4 sets of digits ranging from 0 - 255 separated by a period. When you want to visit a website, it’s not exactly convenient to remember this complicated set of numbers, and that’s where DNS can help. So instead of remembering 104.26.10.229, you can remember tryhackme.com instead. DNS
- What does DNS stand for?
Domain Name System
Task 2 Domain Hierarchy
TLD (Top-Level Domain)
A TLD is the most righthand part of a domain name. So, for example, the tryhackme.com TLD is .com. There are two types of TLD, gTLD (Generic Top Level) and ccTLD (Country Code Top Level Domain). Historically a gTLD was meant to tell the user the domain name’s purpose; for example, a .com would be for commercial purposes, .org for an organisation, .edu for education and .gov for government. And a ccTLD was used for geographical purposes, for example, .ca for sites based in Canada, .co.uk for sites based in the United Kingdom and so on. Due to such demand, there is an influx of new gTLDs ranging from .online , .club , .website , .biz and so many more. For a full list of over 2000 TLDs click here.
Second-Level Domain
Taking tryhackme.com as an example, the .com part is the TLD, and tryhackme is the Second Level Domain. When registering a domain name, the second-level domain is limited to 63 characters + the TLD and can only use a-z 0-9 and hyphens (cannot start or end with hyphens or have consecutive hyphens).
Subdomain
A subdomain sits on the left-hand side of the Second-Level Domain using a period to separate it; for example, in the name admin.tryhackme.com the admin part is the subdomain. A subdomain name has the same creation restrictions as a Second-Level Domain, being limited to 63 characters and can only use a-z 0-9 and hyphens (cannot start or end with hyphens or have consecutive hyphens). You can use multiple subdomains split with periods to create longer names, such as jupiter.servers.tryhackme.com. But the length must be kept to 253 characters or less. There is no limit to the number of subdomains you can create for your domain name.
- What is the maximum length of a subdomain?
63 - Which of the following characters cannot be used in a subdomain ( 3 b _ - )?
_ - What is the maximum length of a domain name?
253 - What type of TLD is .co.uk?
ccTLD
Task 3 Record Types
DNS Record Types
DNS isn’t just for websites though, and multiple types of DNS record exist. We’ll go over some of the most common ones that you’re likely to come across.
A Record
These records resolve to IPv4 addresses, for example 104.26.10.229
AAAA Record
These records resolve to IPv6 addresses, for example 2606:4700:20::681a:be5
CNAME Record
These records resolve to another domain name, for example, TryHackMe’s online shop has the subdomain name store.tryhackme.com which returns a CNAME record shops.shopify.com. Another DNS request would then be made to shops.shopify.com to work out the IP address.
MX Record
These records resolve to the address of the servers that handle the email for the domain you are querying, for example an MX record response for tryhackme.com would look something like alt1.aspmx.l.google.com. These records also come with a priority flag. This tells the client in which order to try the servers, this is perfect for if the main server goes down and email needs to be sent to a backup server.
TXT Record
TXT records are free text fields where any text-based data can be stored. TXT records have multiple uses, but some common ones can be to list servers that have the authority to send an email on behalf of the domain (this can help in the battle against spam and spoofed email). They can also be used to verify ownership of the domain name when signing up for third party services.
- What type of record would be used to advise where to send email?
MX - What type of record handles IPv6 addresses?
AAAA
Task 4 Making A Request
- When you request a domain name, your computer first checks its local cache to see if you’ve previously looked up the address recently; if not, a request to your Recursive DNS Server will be made.
- A Recursive DNS Server is usually provided by your ISP, but you can also choose your own. This server also has a local cache of recently looked up domain names. If a result is found locally, this is sent back to your computer, and your request ends here (this is common for popular and heavily requested services such as Google, Facebook, Twitter). If the request cannot be found locally, a journey begins to find the correct answer, starting with the internet’s root DNS servers.
- The root servers act as the DNS backbone of the internet; their job is to redirect you to the correct Top Level Domain Server, depending on your request. If, for example, you request www.tryhackme.com, the root server will recognise the Top Level Domain of .com and refer you to the correct TLD server that deals with .com addresses.
- The TLD server holds records for where to find the authoritative server to answer the DNS request. The authoritative server is often also known as the nameserver for the domain. For example, the name server for tryhackme.com is kip.ns.cloudflare.com and uma.ns.cloudflare.com. You’ll often find multiple nameservers for a domain name to act as a backup in case one goes down.
- An authoritative DNS server is the server that is responsible for storing the DNS records for a particular domain name and where any updates to your domain name DNS records would be made. Depending on the record type, the DNS record is then sent back to the Recursive DNS Server, where a local copy will be cached for future requests and then relayed back to the original client that made the request. DNS records all come with a TTL (Time To Live) value. This value is a number represented in seconds that the response should be saved for locally until you have to look it up again. Caching saves on having to make a DNS request every time you communicate with a server.
- What field specifies how long a DNS record should be cached for?
TTL - What type of DNS Server is usually provided by your ISP?
recursive - What type of server holds all the records for a domain?
authoritative
Task 5 Practical
Using the website on the right, we can build requests to make DNS queries and view the results. The website will also show you the command you’d need to run on your own computer if you wished to make the requests yourself. Answer the questions below
- What is the CNAME of shop.website.thm?
shops.myshopify.com - What is the value of the TXT record of website.thm?
THM{7012BBA60997F35A9516C2E16D2944FF} - What is the numerical priority value for the MX record?
30 - What is the IP address for the A record of www.website.thm?
10.10.10.10
HTTP in detail
Task 1 What is HTTP(S)?
What is HTTP? (HyperText Transfer Protocol)
HTTP is what’s used whenever you view a website, developed by Tim Berners-Lee and his team between 1989-1991. HTTP is the set of rules used for communicating with web servers for the transmitting of webpage data, whether that is HTML, Images, Videos, etc.
What is HTTPS? (HyperText Transfer Protocol Secure)
HTTPS is the secure version of HTTP. HTTPS data is encrypted so it not only stops people from seeing the data you are receiving and sending, but it also gives you assurances that you’re talking to the correct web server and not something impersonating it.
- What does HTTP stand for?
HyperText Transfer Protocol - What does the S in HTTPS stand for?
secure - On the mock webpage on the right there is an issue, once you’ve found it, click on it. What is the challenge flag?
THM{INVALID_HTTP_CERT}
Task 2 Requests And Responses
When we access a website, your browser will need to make requests to a web server for assets such as HTML, Images, and download the responses. Before that, you need to tell the browser specifically how and where to access these resources, this is where URLs will help.
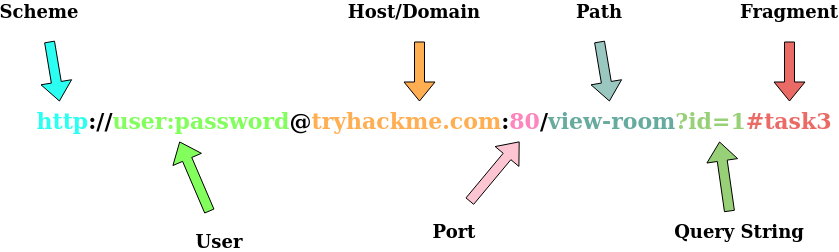
What is a URL? (Uniform Resource Locator)
If you’ve used the internet, you’ve used a URL before. A URL is predominantly an instruction on how to access a resource on the internet. The below image shows what a URL looks like with all of its features (it does not use all features in every request). Uniform Resource Locator
Scheme: This instructs on what protocol to use for accessing the resource such as HTTP, HTTPS, FTP (File Transfer Protocol).
User: Some services require authentication to log in, you can put a username and password into the URL to log in.
Host: The domain name or IP address of the server you wish to access.
Port: The Port that you are going to connect to, usually 80 for HTTP and 443 for HTTPS, but this can be hosted on any port between 1 - 65535.
Path: The file name or location of the resource you are trying to access.
Query String: Extra bits of information that can be sent to the requested path. For example, /blog?id=1 would tell the blog path that you wish to receive the blog article with the id of 1.
Fragment: This is a reference to a location on the actual page requested. This is commonly used for pages with long content and can have a certain part of the page directly linked to it, so it is viewable to the user as soon as they access the page.
But for a much richer web experience, you’ll need to send other data as well. This other data is sent in what is called headers, where headers contain extra information to give to the web server you’re communicating with, but we’ll go more into this in the Header task.
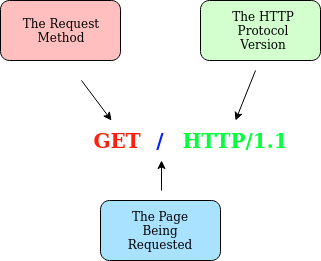
Example Request:
GET / HTTP/1.1
Host: tryhackme.com
User-Agent: Mozilla/5.0 Firefox/87.0
Referer: https://tryhackme.com/
To breakdown each line of this request:
Line 1: This request is sending the GET method ( more on this in the HTTP Methods task ), request the home page with / and telling the web server we are using HTTP protocol version 1.1.
Line 2: We tell the web server we want the website tryhackme.com
Line 3: We tell the web server we are using the Firefox version 87 Browser
Line 4: We are telling the web server that the web page that referred us to this one is https://tryhackme.com
Line 5: HTTP requests always end with a blank line to inform the web server that the request has finished.
Example Response:
HTTP/1.1 200 OK
Server: nginx/1.15.8
Date: Fri, 09 Apr 2021 13:34:03 GMT
Content-Type: text/html
Content-Length: 98

<html>
<head>
    <title>TryHackMe</title>
</head>
<body>
    Welcome To TryHackMe.com
</body>
</html>
To breakdown each line of the response:
Line 1: HTTP 1.1 is the version of the HTTP protocol the server is using and then followed by the HTTP Status Code in this case “200 Ok” which tells us the request has completed successfully.
Line 2: This tells us the web server software and version number.
Line 3: The current date, time and timezone of the web server.
Line 4: The Content-Type header tells the client what sort of information is going to be sent, such as HTML, images, videos, pdf, XML.
Line 5: Content-Length tells the client how long the response is, this way we can confirm no data is missing.
Line 6: HTTP response contains a blank line to confirm the end of the HTTP response.
Lines 7-14: The information that has been requested, in this instance the homepage.
- What HTTP protocol is being used in the above example?
HTTP/1.1 - What response header tells the browser how much data to expect?
Content-Length
Task 3 HTTP Methods
HTTP methods are a way for the client to show their intended action when making an HTTP request. There are a lot of HTTP methods but we’ll cover the most common ones, although mostly you’ll deal with the GET and POST method.
GET Request
This is used for getting information from a web server.
POST Request
This is used for submitting data to the web server and potentially creating new records
PUT Request
This is used for submitting data to a web server to update information
DELETE Request
This is used for deleting information/records from a web server.
- What method would be used to create a new user account?
POST - What method would be used to update your email address?
PUT - What method would be used to remove a picture you’ve uploaded to your account?
DELETE - What method would be used to view a news article?
GET
Task 4 HTTP Status Codes
HTTP Status Codes: In the previous task, you learnt that when a HTTP server responds, the first line always contains a status code informing the client of the outcome of their request and also potentially how to handle it. These status codes can be broken down into 5 different ranges:
Common HTTP Status Codes:
There are a lot of different HTTP status codes and that’s not including the fact that applications can even define their own, we’ll go over the most common HTTP responses you are likely to come across:
- What response code might you receive if you’ve created a new user or blog post article?
201 - What response code might you receive if you’ve tried to access a page that doesn’t exist?
404 - What response code might you receive if the web server cannot access its database and the application crashes?
503 - What response code might you receive if you try to edit your profile without logging in first?
401
Task 5 Headers
Headers are additional bits of data you can send to the web server when making requests.
Although no headers are strictly required when making a HTTP request, you’ll find it difficult to view a website properly.
Common Request Headers
These are headers that are sent from the client (usually your browser) to the server.
Host: Some web servers host multiple websites so by providing the host headers you can tell it which one you require, otherwise you’ll just receive the default website for the server.
User-Agent: This is your browser software and version number, telling the web server your browser software helps it format the website properly for your browser and also some elements of HTML, JavaScript and CSS are only available in certain browsers.
Content-Length: When sending data to a web server such as in a form, the content length tells the web server how much data to expect in the web request. This way the server can ensure it isn’t missing any data.
Accept-Encoding: Tells the web server what types of compression methods the browser supports so the data can be made smaller for transmitting over the internet.
Cookie: Data sent to the server to help remember your information (see cookies task for more information). Common Response Headers
These are the headers that are returned to the client from the server after a request.
Set-Cookie: Information to store which gets sent back to the web server on each request (see cookies task for more information).
Cache-Control: How long to store the content of the response in the browser’s cache before it requests it again.
Content-Type: This tells the client what type of data is being returned, i.e., HTML, CSS, JavaScript, Images, PDF, Video, etc. Using the content-type header the browser then knows how to process the data.
Content-Encoding: What method has been used to compress the data to make it smaller when sending it over the internet.
- What header tells the web server what browser is being used?
User-Agent - What header tells the browser what type of data is being returned?
Content-Type - What header tells the web server which website is being requested?
Host
Task 6 Cookies
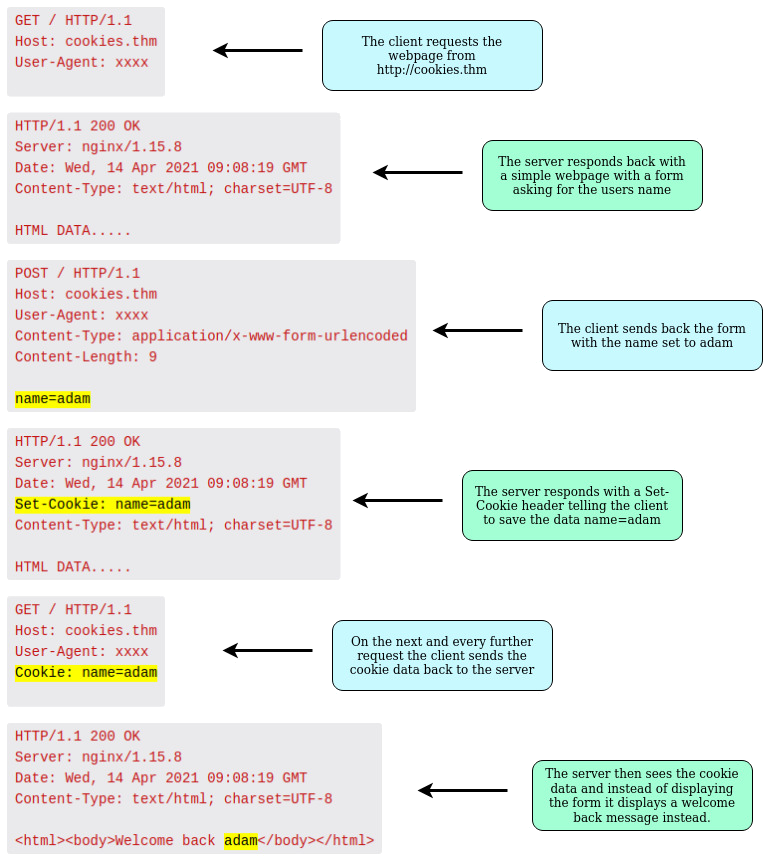
You’ve probably heard of cookies before, they’re just a small piece of data that is stored on your computer. Cookies are saved when you receive a “Set-Cookie” header from a web server. Then every further request you make, you’ll send the cookie data back to the web server. Because HTTP is stateless (doesn’t keep track of your previous requests), cookies can be used to remind the web server who you are, some personal settings for the website or whether you’ve been to the website before. Let’s take a look at this as an example HTTP request: example
Cookies can be used for many purposes but are most commonly used for website authentication. The cookie value won’t usually be a clear-text string where you can see the password, but a token (unique secret code that isn’t easily humanly guessable).
Viewing Your Cookies
You can easily view what cookies your browser is sending to a website by using the developer tools, in your browser. If you’re not sure how to get to the developer tools in your browser, click on the “View Site” button at the top of this task for a how-to guide.
Once you have developer tools open, click on the “Network” tab. This tab will show you a list of all the resources your browser has requested. You can click on each one to receive a detailed breakdown of the request and response. If your browser sent a cookie, you will see these on the “Cookies” tab of the request.
- Which header is used to save cookies to your computer?
Set-Cookie
Task 7 Making Requests
Click the “View Site” button on the right.
This is an emulator for making demo HTTP requests, using what you’ve learnt from the above tasks you can use it to complete the below questions.
- Make a GET request to /room
THM{YOU'RE_IN_THE_ROOM} - Make a GET request to /blog and using the gear icon set the id parameter to 1 in the URL field
THM{YOU_FOUND_THE_BLOG} - Make a DELETE request to /user/1
THM{USER_IS_DELETED} - Make a PUT request to /user/2 with the username parameter set to admin
THM{USER_HAS_UPDATED} - POST the username of thm and a password of letmein to /login
THM{HTTP_REQUEST_MASTER}
How websites work
How websites work
By the end of this room, you’ll know how websites are created and will be introduced to some basic security issues.
When you visit a website, your browser (like Safari or Google Chrome) makes a request to a web server asking for information about the page you’re visiting. It will respond with data that your browser uses to show you the page; a web server is just a dedicated computer somewhere else in the world that handles your requests. Example
There are two major components that make up a website:
Front End (Client-Side) - the way your browser renders a website. Back End (Server-Side) - a server that processes your request and returns a response. There are many other processes involved in your browser making a request to a web server, but for now, you just need to understand that you make a request to a server, and it responds with data your browser uses to render information to you.
- What term best describes the side your browser renders a website?
Client side
Task 2 HTML
Websites are primarily created using:
HTML, to build websites and define their structure CSS, to make websites look pretty by adding styling options JavaScript, implement complex features on pages using interactivity HyperText Markup Language (HTML) is the language websites are written in. Elements (also known as tags) are the building blocks of HTML pages and tells the browser how to display content. The code snippet below shows a simple HTML document, the structure of which is the same for every website: HTML The HTML structure (as shown in the screenshot) has the following components:
The <!DOCTYPE html> defines that the page is a HTML5 document. This helps with standardisation across different browsers and tells the browser to use HTML5 to interpret the page.
The <html> element is the root element of the HTML page - all other elements come after this element.
The <head> element contains information about the page (such as the page title)
The <body> element defines the HTML document’s body; only content inside of the body is shown in the browser.
The <h1> element defines a large heading
The <p> element defines a paragraph
There are many other elements (tags) used for different purposes. For example, there are tags for buttons (<button>), images (<img>), lists, and much more.
Tags can contain attributes such as the class attribute which can be used to style an element (e.g. make the tag a different color) <p class="bold-text">, or the src attribute which is used on images to specify the location of an image: <img src="img/cat.jpg">.An element can have multiple attributes each with its own unique purpose, e.g., <p attribute1="value1" attribute2="value2">.
Elements can also have an id attribute (<p id="example">), which is unique to the element. Unlike the class attribute, where multiple elements can use the same class, an element must have different id’s to identify them uniquely. Element id’s are used for styling and to identify it by JavaScript.
You can view the HTML of any website by right-clicking and selecting “View Page Source” (Chrome) / “Show Page Source” (Safari).
- One of the images on the cat website is broken - fix it, and the image will reveal the hidden text answer!
HTMLHERO - Add a dog image to the page by adding another img tag (
) on line 11. The dog image location is img/dog-1.png
DOGHTML
Task 3 JavaScript
avaScript (JS) is one of the most popular coding languages in the world and allows pages to become interactive. HTML is used to create the website structure and content, while JavaScript is used to control the functionality of web pages - without JavaScript, a page would not have interactive elements and would always be static. JS can dynamically update the page in real-time, giving functionality to change the style of a button when a particular event on the page occurs (such as when a user clicks a button) or to display moving animations.
JavaScript is added within the page source code and can be either loaded within <script> tags or can be included remotely with the src attribute: <script src="/location/of/javascript_file.js"></script>
The following JavaScript code finds a HTML element on the page with the id of “demo” and changes the element’s contents to “Hack the Planet” : document.getElementById("demo").innerHTML = "Hack the Planet";
HTML elements can also have events, such as “onclick” or “onhover” that execute JavaScript when the event occurs. The following code changes the text of the element with the demo ID to Button Clicked: <button onclick='document.getElementById("demo").innerHTML = "Button Clicked";'>Click Me!</button> - onclick events can also be defined inside the JavaScript script tags, and not on elements directly.
- Click the “View Site” button on this task. On the right-hand side, add JavaScript that changes the demo element’s content to “Hack the Planet”
JSISFUN
Task 4 Sensitive Data Exposure
Sensitive Data Exposure occurs when a website doesn’t properly protect (or remove) sensitive clear-text information to the end-user; usually found in a site’s frontend source code.
We now know that websites are built using many HTML elements (tags), all of which we can see simply by “viewing the page source”. A website developer may have forgotten to remove login credentials, hidden links to private parts of the website or other sensitive data shown in HTML or JavaScript.
Sensitive information can be potentially leveraged to further an attacker’s access within different parts of a web application. For example, there could be HTML comments with temporary login credentials, and if you viewed the page’s source code and found this, you could use these credentials to log in elsewhere on the application (or worse, used to access other backend components of the site).
Whenever you’re assessing a web application for security issues, one of the first things you should do is review the page source code to see if you can find any exposed login credentials or hidden links. Example
- View the website on this task. What is the password hidden in the source code?
testpasswd
Task 5 HTML Injection
HTML Injection is a vulnerability that occurs when unfiltered user input is displayed on the page. If a website fails to sanitise user input (filter any “malicious” text that a user inputs into a website), and that input is used on the page, an attacker can inject HTML code into a vulnerable website.
Input sanitisation is very important in keeping a website secure, as information a user inputs into a website is often used in other frontend and backend functionality. A vulnerability you’ll explore in another lab is database injection, where you can manipulate a database lookup query to log in as another user by controlling the input that’s directly used in the query - but for now, let’s focus on HTML injection (which is client-side).
When a user has control of how their input is displayed, they can submit HTML (or JavaScript) code, and the browser will use it on the page, allowing the user to control the page’s appearance and functionality. HTML Injection
The image above shows how a form outputs text to the page. Whatever the user inputs into the “What’s your name” field is passed to a JavaScript function and output to the page, which means if the user adds their own HTML or JavaScript in the field, it’s used in the sayHi function and is added to the page this means you can add your own HTML (such as a <h1> tag) and it will output your input as pure HTML.
The general rule is never to trust user input. To prevent malicious input, the website developer should sanitise everything the user enters before using it in the JavaScript function; in this case, the developer could remove any HTML tags.
- View the website on this task and inject HTML so that a malicious link to http://hacker.com is shown.
HTML_INJ3CTI0N